

This is my final work for CClab.
I made an interactive narrative.
This is my presentation pdf.
Click to access FINAL_1210_cclab.pdf
And this is my highlight video of my work.
Thank you.
This is my final work for CClab.
I made an interactive narrative.
This is my presentation pdf.
Click to access FINAL_1210_cclab.pdf
And this is my highlight video of my work.
Thank you.
Filed under Uncategorized
I did my Openframework! I changed color and position just a little bit, but it was so much fun!
Filed under Homework
I upload all my arduino HW in this post.
1. 3 LEDs
int ledPin_red = 11;
int ledPin_yellow = 12;
int ledPin_blue = 13;
void setup(){
Serial.begin(9600);
pinMode(ledPin_red, OUTPUT);
pinMode(ledPin_yellow, OUTPUT);
pinMode(ledPin_blue, OUTPUT);
}
void loop(){
digitalWrite(ledPin_red, HIGH);
delay(100);
digitalWrite(ledPin_red, LOW);
delay(100);
digitalWrite(ledPin_yellow, HIGH);
delay(100);
digitalWrite(ledPin_yellow, LOW);
delay(100);
digitalWrite(ledPin_blue, HIGH);
delay(100);
digitalWrite(ledPin_blue, LOW);
delay(100);
digitalWrite(ledPin_red, HIGH);
digitalWrite(ledPin_yellow, HIGH);
digitalWrite(ledPin_blue, HIGH);
delay(1000);
digitalWrite(ledPin_red, LOW);
digitalWrite(ledPin_yellow, LOW);
digitalWrite(ledPin_blue, LOW);
delay(1000);
}

2. 3 LEDs and 3 Buttons
int ledPin_red = 11;
int ledPin_yellow = 12;
int ledPin_blue = 13;
int buttonPin_r = 4;
int buttonPin_y = 8;
int buttonPin_b = 10;
boolean pushed_R = false;
boolean pushed_Y = false;
boolean pushed_B = false;
void setup(){
Serial.begin(9600);
pinMode(ledPin_red, OUTPUT);
pinMode(ledPin_yellow, OUTPUT);
pinMode(ledPin_blue, OUTPUT);
pinMode(buttonPin_r, INPUT);
pinMode(buttonPin_y, INPUT);
pinMode(buttonPin_b, INPUT);
digitalWrite(buttonPin_r, HIGH);
digitalWrite(buttonPin_y, HIGH);
digitalWrite(buttonPin_b, HIGH);
}
void loop(){
static int buttonState_r;
static int buttonState_y;
static int buttonState_b;
buttonState_r = digitalRead(buttonPin_r);
buttonState_y = digitalRead(buttonPin_y);
buttonState_b = digitalRead(buttonPin_b);
if(!buttonState_r){
pushed_R = !pushed_R;
if(pushed_R){
digitalWrite(ledPin_red, HIGH);
delay(100);
}else if(!pushed_R){
digitalWrite(ledPin_red, LOW);
delay(100);
}
}
if(!buttonState_y){
pushed_Y = !pushed_Y;
if(pushed_Y){
digitalWrite(ledPin_yellow, HIGH);
delay(100);
}else if(!pushed_Y){
digitalWrite(ledPin_yellow, LOW);
delay(100);
}
}
if(!buttonState_b){
pushed_B = !pushed_B;
if(pushed_B){
digitalWrite(ledPin_blue, HIGH);
delay(100);
}else if(!pushed_B){
digitalWrite(ledPin_blue, LOW);
delay(100);
}
}
}

3. serial input
int ledPin [] = {8,9,10,11};\
int buzzerPin = 2;
int incomingByte = 0;
void setup(){
Serial.begin(9600);
for(int i=0; i<4; i++)
pinMode(ledPin[i], OUTPUT);
pinMode(buzzerPin, OUTPUT);
}
void loop(){
if(Serial.available() >0){
incomingByte = Serial.read();
if(incomingByte ==’ ‘){
delay(500);
}else if(incomingByte == ‘r’){
digitalWrite(ledPin[0], HIGH);
tone(buzzerPin, 1000);
delay(500);
noTone(buzzerPin);
digitalWrite(ledPin[0], LOW);
}else if(incomingByte == ‘y’){
digitalWrite(ledPin[1], HIGH);
tone(buzzerPin, 1500);
delay(500);
noTone(buzzerPin);
digitalWrite(ledPin[1], LOW);
}else if(incomingByte == ‘g’){
digitalWrite(ledPin[2], HIGH);
tone(buzzerPin, 2000);
delay(500);
noTone(buzzerPin);
digitalWrite(ledPin[2], LOW);
}else if(incomingByte == ‘b’){
digitalWrite(ledPin[3], HIGH);
tone(buzzerPin, 2500);
delay(500);
noTone(buzzerPin);
digitalWrite(ledPin[3], LOW);
}
Serial.print(char(incomingByte));
}
}

Filed under Homework
I wanted to make a webpage which shows both time and weather. There are three circles for hour, minute and second. The circles changed by realtime, and for fourth space I put the sun and moon images for indicating daytime and nighttime. During 6AM to 6PM, a sun image is shown up, and after 6PM to before 6AM, a moon image is shown up.
This is my code.
<!DOCTYPE html>
<html>
<body onload=”setTime();”>
<canvas id=”myCanvas1″ width=”200″ height=”300″ style=”border:0px solid #d3d3d3;”>
Your browser does not support the HTML5 canvas tag.</canvas>
<canvas id=”myCanvas2″ width=”200″ height=”300″ style=”border:0px solid #d3d3d3;”>
Your browser does not support the HTML5 canvas tag.</canvas>
<canvas id=”myCanvas3″ width=”200″ height=”300″ style=”border:0px solid #d3d3d3;”>
Your browser does not support the HTML5 canvas tag.</canvas>
<canvas id=”myCanvas4″ width=”300″ height=”300″ style=”border:0px solid #d3d3d3;”>
Your browser does not support the HTML5 canvas tag.</canvas>
<script>
var c1=document.getElementById(“myCanvas1”);
var c2=document.getElementById(“myCanvas2”);
var c3=document.getElementById(“myCanvas3”);
var ctx1 = c1.getContext(“2d”);
var ctx2 = c2.getContext(“2d”);
var ctx3 = c3.getContext(“2d”);
var pi = Math.PI/30;
var H_timer;
var M_timer;
var S_timer;
var hour;
var min;
var sec;
// Time now
function setTime() {
var now = new Date();
hour = now.getHours();
min = now.getMinutes();
sec = now.getSeconds();
S_Clock();
M_Clock();
H_Clock();
}
// hour
function H_Clock()
{
ctx1.clearRect(0, 0, c1.width, c1.height);
ctx1.beginPath();
ctx1.strokeStyle = ‘#000000’;
ctx1.lineWidth = 20;
ctx1.arc(100,100,70,pi*45,pi*(45+(hour*2.5)));
ctx1.stroke();
ctx1.closePath();
ctx1.font=”30px Helvetica”;
ctx1.fillStyle = ‘#000000’;
if(hour == 24) hour = 0;
ctx1.fillText(hour+””,85,110);
hour = hour + 1;
}
//function DAY()
if(18 > hour && hour > 6) {
//DAY
var canvas = document.getElementById(‘myCanvas4’);
var context = canvas.getContext(‘2d’);
var imageObj01 = new Image();
imageObj01.onload = function() {
//where to draw image at top left
context.drawImage(imageObj01, 0, -30);
};
//image source
imageObj01.src = ‘http://vremebo.com/images/weather/clear-night.png’;
}else {
//function NIGHT()
// if(hour > 18 && 6 > hour)
//NIGHT
var canvas = document.getElementById(‘myCanvas4’);
var context = canvas.getContext(‘2d’);
var imageObj02 = new Image()
width: 200
height: 200;
imageObj02.onload = function() {
//where to draw image at top left
context.drawImage(imageObj02, 0, -30);
};
//image source
imageObj02.src = ‘http://indywx.com/wp-content/uploads/2013/10/Status-weather-clear-icon.png’;
}
// Min
function M_Clock()
{
ctx2.clearRect(0, 0, c2.width, c2.height);
ctx2.beginPath();
ctx2.strokeStyle = ‘#515151’;
ctx2.lineWidth = 10;
ctx2.arc(100,100,70,pi*45,pi*(45+min));
ctx2.stroke();
ctx2.closePath();
ctx2.font=”30px Helvetica”;
ctx2.fillStyle = ‘#515151’;
if(min == 60) {
min = 0;
H_Clock();
}
ctx2.fillText(min+””,85,110);
min = min + 1;
}
// Sec
function S_Clock()
{
ctx3.clearRect(0, 0, c3.width, c3.height);
ctx3.beginPath();
ctx3.strokeStyle = ‘#a5a5a5’;
ctx3.lineWidth = 1;
ctx3.arc(100,100,70,pi*45,pi*(45+sec));
ctx3.stroke();
ctx3.closePath();
ctx3.font=”30px Helvetica”;
ctx3.fillStyle = ‘#a5a5a5’;
if(sec == 60) {
sec = 0;
M_Clock();
}
ctx3.fillText(sec+””,85,110);
sec = sec + 1;
S_timer = setTimeout(“S_Clock()”, 1000); //
}
</script>
</body>
</html>

Filed under Uncategorized
It was REALLY hard to finish this assignment, however I finally figure out what the API and JSON is. Thanks Master P!! This is not a final version, because I do not have A server. To figure out this assignment Soohyun Park helped me a lot. Following code is what is did.
<!DOCTYPE html>
<html>
<head>
<meta charset=”UTF-8″>
<title>JSON WITH API</title>
<script type=”text/javascript” src=”js/jquery-1.10.2.min.js”></script>
<script type=”text/javascript”>
$(document).ready(function(){
$.ajax({
url: “http://api.wunderground.com/api/466cd5bcf7b4bba0/conditions/q/NY/New_York.json””,
dataType : “jsonp”, //jsonp for cross-origin files
success : function(parsed_json) {
console.log(‘success’);
//each nested object goes in []
var Odata = parsed_json[‘current_observation’][‘display_location’][‘full’];
var Otime = parsed_json[‘current_observation’][‘observation_time’];
var weatherD = parsed_json[‘current_observation’][‘weather’];
var temperatureS = parsed_json[‘current_observation’][‘temperature_string’];
var humidityD = parsed_json[‘current_observation’][‘relative_humidity’];
//var sunset = parsed_json[‘moon_phase’][‘sunset’][‘hour’];
console.log(“observation_location : “+ Odata);
console.log(“observation_time : “+ Otime);
console.log(“weather : “+ weatherD);
console.log(“temperature : “+ temperatureS);
console.log(“humidity : “+ humidityD);
//console.log(parsed_json); //great debugging tool here!
$(“#container”).append(“<h1> Weather in “+ Odata +” </h1>”);
$(“#container”).append(“<p> Time : “+ Otime +” </p>”);
$(“#container”).append(“<p> Weather : “+ weatherD +” </p>”);
$(“#container”).append(“<p> Temperature : “+ temperatureS +” </p>”);
$(“#container”).append(“<p> Humidity : “+ humidityD +” </p>”);
} //end of success
}); //end of ajax
}); //end of doc ready{
</script>
</head>
<body>
<section id=”container”>
</section>
</body>
</html>
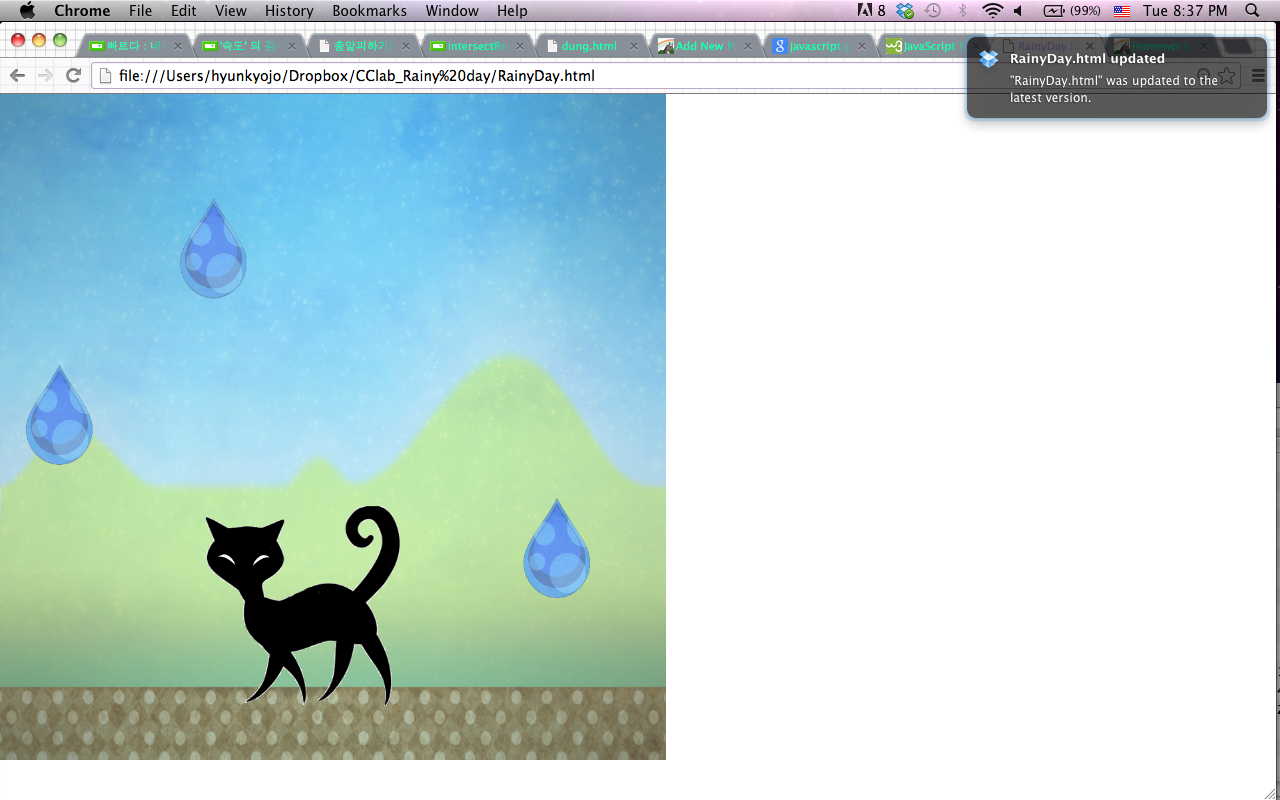
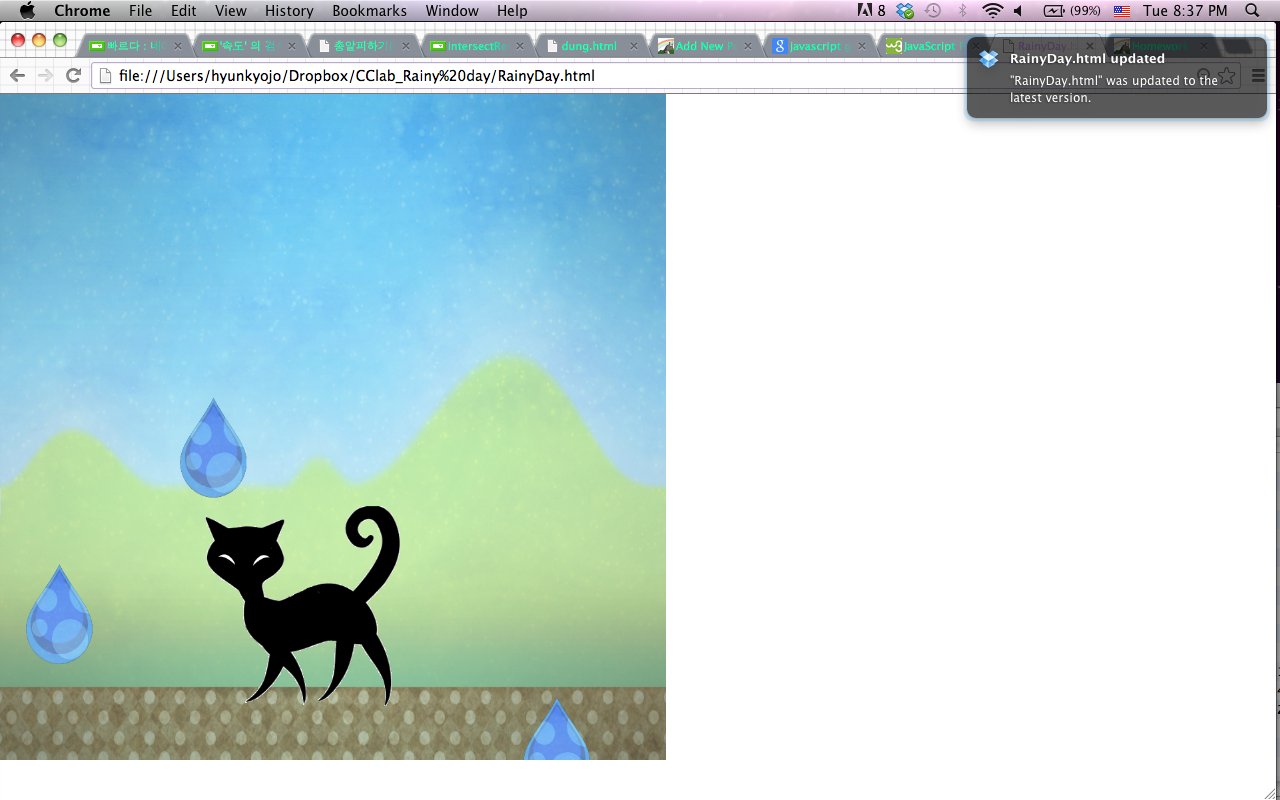
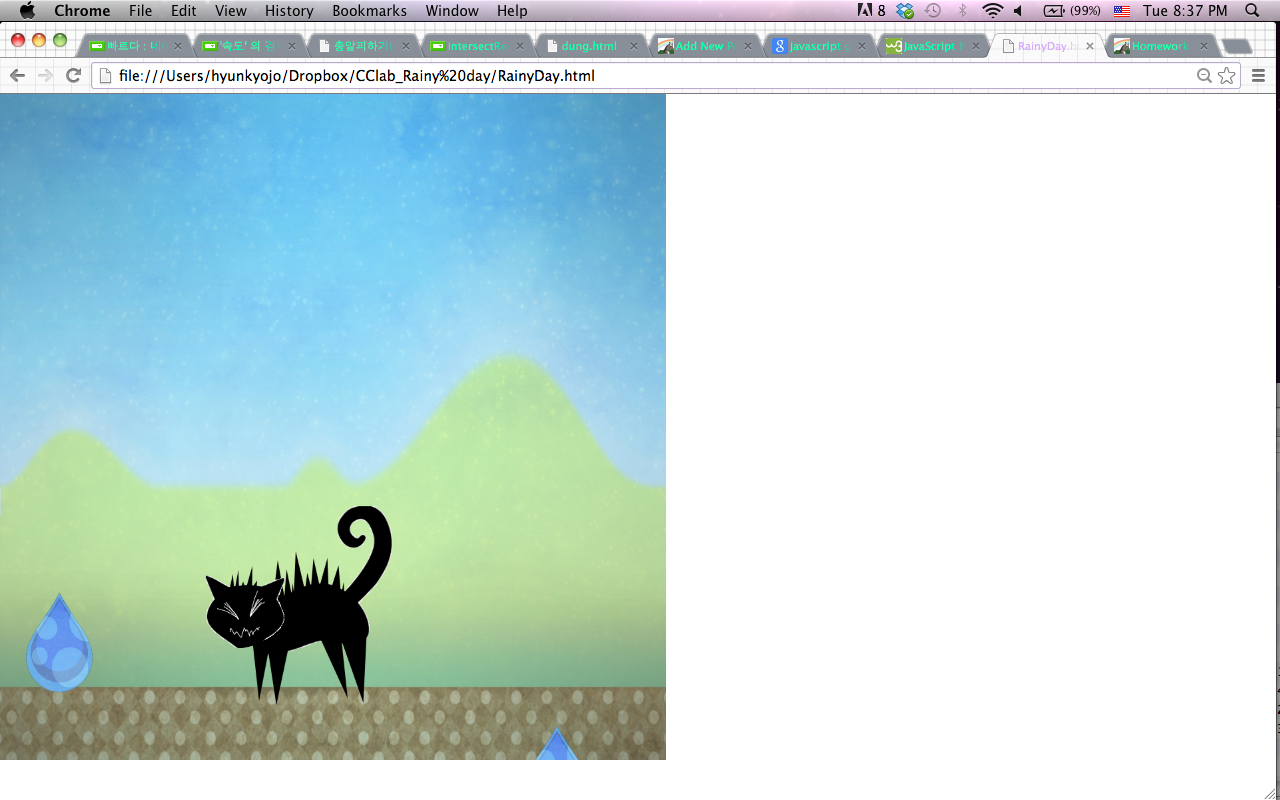
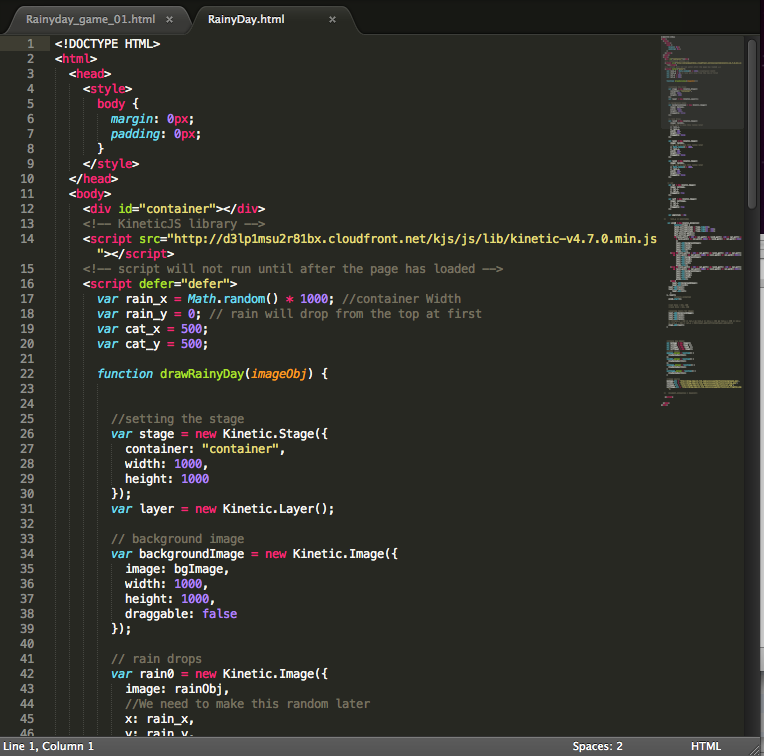
Filed under Homework
Link : http://a.parsons.edu/~leeh578/RainyDay.html
Members : Soohyun Park, Shiny Lee, Hyungou Jo(Helen)
—————————————————————————————-
<!DOCTYPE HTML>
<html>
<head>
<style>
body {
margin: 0px;
padding: 0px;
}
</style>
</head>
<body>
<div id=”container”></div>
<!– KineticJS library –>
<script src=”http://d3lp1msu2r81bx.cloudfront.net/kjs/js/lib/kinetic-v4.7.0.min.js”></script>
<!– script will not run until after the page has loaded –>
<script defer=”defer”>
var rain_x = Math.random() * 1000; //container Width
var rain_y = 0; // rain will drop from the top at first
var cat_x = 500;
var cat_y = 500;
function drawRainyDay(imageObj) {
//setting the stage
var stage = new Kinetic.Stage({
container: “container”,
width: 1000,
height: 1000
});
var layer = new Kinetic.Layer();
// background image
var backgroundImage = new Kinetic.Image({
image: bgImage,
width: 1000,
height: 1000,
draggable: false
});
// rain drops
var rain0 = new Kinetic.Image({
image: rainObj,
//We need to make this random later
x: rain_x,
y: rain_y,
width: 100,
height:150,
draggable: false
});
var rain1 = new Kinetic.Image({
image: rainObj,
//We need to make this random later
x: Math.random() * 1000,
y: rain_y,
width: 100,
height:150,
draggable: false
});
var rain2 = new Kinetic.Image({
image: rainObj,
//We need to make this random later
x: Math.random() * 1000,
y: rain_y,
width: 100,
height:150,
draggable: false
});
// cat
var cat = new Kinetic.Image({
image: catImage,
x: cat_x,
y: cat_y,
draggable: true
});
var catF = new Kinetic.Image({
image: catFImage,
x: cat_x,
y: cat_y,
draggable: true
});
var amplitude = 10;
// rain_y += amplitude;
var anim0 = new Kinetic.Animation(
function(frame) {
rain0.setY(amplitude * frame.time/30);
rain1.setY(amplitude * frame.time/30 – 200);
rain2.setY(amplitude * frame.time/30 – 450);
catF.setX(cat.getX());
catF.setY(cat.getY());
if(rain0.getY() + 130 >= cat.getY() && rain0.getY() -130 <= cat.getY() && rain0.getX() >= cat.getX()-300/2 && rain0.getX() <= cat.getX()+300/2){
layer.add(backgroundImage);
layer.add(rain1);
layer.add(rain2);
layer.add(catF);
anim0.stop();
}else if(rain1.getY() + 130 >= cat.getY() && rain1.getY() -130 <= cat.getY() && rain1.getX() >= cat.getX()-300/2 && rain1.getX() <= cat.getX()+300/2){
layer.add(backgroundImage);
layer.add(rain0);
layer.add(rain2);
layer.add(catF);
anim0.stop();
}else if(rain2.getY() + 130 >= cat.getY() && rain2.getY() -130 <= cat.getY() && rain2.getX() >= cat.getX()-300/2 && rain2.getX() <= cat.getX()+300/2){
layer.add(backgroundImage);
layer.add(rain1);
layer.add(rain0);
layer.add(catF);
anim0.stop();
}else{
layer.add(backgroundImage);
layer.add(rain0);
layer.add(rain1);
layer.add(rain2);
layer.add(cat);
}
}, layer);
//starts animation
anim0.start();
//cat Size : 292, 300
//rain Size : 261, 350
//placing layers for images
layer.add(backgroundImage);
layer.add(rain0);
layer.add(rain1);
layer.add(rain2);
// if(rain_x + 340 >= cat_x && rain_x <= cat_x + 292 && rain_y + 350 >= cat_y && rain_y – 340 <= cat_y + 300){layer.add(catF)}else{layer.add(cat);}
stage.add(layer);
}
//create new images
var bgImage = new Image();
var rainObj = new Image ();
var catImage = new Image ();
var catFImage = new Image();
//loads images
bgImage.onload = function() {
drawRainyDay(this);
};
rainObj.onload = function() {
drawRainyDay(this);
};
catImage.onload = function() {
drawRainyDay(this);
}
catFImage.onload = function() {
drawRainyDay(this);
}
//image source
bgImage.src = ‘http://blog-imgs-61.fc2.com/w/e/a/weatherfield/background.png’,
rainObj.src = ‘http://blog-imgs-61.fc2.com/w/e/a/weatherfield/raindrop.png’;
catImage.src = ‘http://blog-imgs-61.fc2.com/w/e/a/weatherfield/cat.png’;
catFImage.src = ‘http://blog-imgs-61.fc2.com/w/e/a/weatherfield/cat_frighten.png’;
// document.onkeypress = keyevent;
</script>
</body>
</html>
I learned a grid on canvas and It is little similar with the graphic tools like Illustrator.
In my assignment, I tried to move a circle randomly but I cannot. So I tried to make constant movement.
————————————————-
context.beginPath();
context.arc(ball.x, ball.y, 5, 0, 2*Math.PI, true);
context.fillStyle = “white”;
context.shadowColor = “magenta”;
context.shadowBlur = 10;
context.fill();
ball.x += ball.dx;
ball.y += ball.dy;
if(ball.x-5 < 0 || ball.x+5 > 300){
ball.dx *= -1;
}
if(ball.y-5 <0 || ball.y+5 > 300){
ball.dy *= -1;
//canvas.onclick = function() {}
—————————————————-I asked my friend who works as a web designer in this part.
I want to make couple of circles more, but It is really hard to me. I should ask during the class.
I recorded the monitor screen so you can see my work with movement through a video clip.
I temporarily upload my video clip on my VIMEO so the link down below will show a video clip.
——————————————————————————-
<!doctype html>
<html>
<head>
<meta charset=”en”>
<title>Week2_HW</title>
</head>
<body>
<canvas id=”awesome canvas” width=”300″ height=”300″></canvas>
<script type=”text/javascript”>
function draw() {
var canvas = document.getElementById(“awesome canvas”); if (canvas.getContext) {
var context = canvas.getContext(“2d”);
context.fillStyle = “Black”;
context.font = “50px Arial”
context.fillText(“You may fall in sleep”, 40, 350);
} }
var canvas = document.getElementById(“awesome canvas”);
var context = canvas.getContext(“2d”);
var ball = {x:10, y:100, dx:2, dy:2};
setInterval(drawBall, 30);
function drawBall(){
var i;
console.log(“call”);
context.strokeStyle = “Red”;
context.strokeRect(0,0,300,300);
//context.fillStyle = “black”;
//context.fillRect(0, 0, 300, 300)
//context.fill();
context.beginPath();
context.arc(ball.x, ball.y, 5, 0, 2*Math.PI, true);
context.fillStyle = “white”;
context.shadowColor = “magenta”;
context.shadowBlur = 10;
context.fill();
ball.x += ball.dx;
ball.y += ball.dy;
if(ball.x-5 < 0 || ball.x+5 > 300){
ball.dx *= -1;
}
if(ball.y-5 <0 || ball.y+5 > 300){
ball.dy *= -1;
//canvas.onclick = function() {}
}
}
</script>
</body>
</html>
——————————————————————————-


Filed under Homework, Uncategorized
<!DOCTYPE html>
<html>
<head>
<title>My Basic HTML</title>
</head>
<body>
<script type=”text/javascript”>
//this is where javascript lives
console.log(“This is javascript println();”);
var noun1 = “nerd”;
var noun2 = “princess”;
var verb1 = “dance”;
var verb2 = “cry”;
var adj1 = “lazy”;
var adj2 = “complicated”;
var sentence = “Hello!” + noun1 + “. It will be a ” + adj1 + ” day. I am a ” + noun2 + “. I usually ” + verb1 + “. Whenever I ” + verb1 + ” my parents ” + verb2 + “. Because My dance is so ” + adj2 + “.”;
console.log(sentence);
</script>
</body>
</html>

Filed under Homework
