3 leds

int led1 = 1;
int led2 = 2;
int led3 = 3;

void setup() {
pinMode(led1, OUTPUT);
pinMode(led2, OUTPUT);
pinMode(led3, OUTPUT);
}

void loop() {
digitalWrite (led1, HIGH);
delay(500);
digitalWrite(led1, LOW);
delay(500);
digitalWrite(led2, HIGH);
delay(1000);
digitalWrite(led2, LOW);
delay(500);
digitalWrite(led3,HIGH);
delay(1500);
digitalWrite(led3,LOW);
delay(500);
}

video

Leave a comment

Filed under Uncategorized

Arduino Button&LED- Sandra

https://vimeo.com/76981681

Leave a comment

by | October 15, 2013 · 2:36 pm

Arduino HW

#1  LED

[Video]

Please click here

[Fritz]

3led

[Code]

int led = 13;
int led2 = 12;
int led3 = 11;
void setup() {
  pinMode(led, OUTPUT);
  pinMode(led2, OUTPUT);
  pinMode(led3, OUTPUT);
}
void loop() {
  digitalWrite(led, HIGH);
  delay(1000);
  digitalWrite(led, LOW);
  delay(1000);
  {
  digitalWrite(led2, HIGH);
  delay(1000);
  digitalWrite(led2, LOW);
  delay(1000);
  {
  digitalWrite(led3, HIGH);
  delay(1000);
  digitalWrite(led3, LOW);
  delay(1000);
}}

}

                       
#2 LED + Button

[Video]

Please click here

[Fritz]

ledbut

[Code]

int led = 13;
int led2 = 12;
int but =2;
int but2=4;
int buttonState= 0;
int button2State= 0;

void setup() {
pinMode(led, OUTPUT);
pinMode(led2, OUTPUT);
pinMode(but, INPUT);
pinMode(but2, INPUT);
}

void loop(){
buttonState = digitalRead(but);
button2State = digitalRead(but2);

if (buttonState == HIGH) {
digitalWrite(led, HIGH);
digitalWrite(led2, LOW);
}
else if (button2State == HIGH) {
digitalWrite(led2, HIGH);
digitalWrite(led, LOW);
}
else {
digitalWrite(led2, LOW);
digitalWrite(led, LOW);
}}

Leave a comment

Filed under Homework

Arduino Assignment#1: LEDs and Buttons


I could play with LEDs and Buttons ! I wanted to make cute 3 LED lights.  Also, I wanted to try boolean buttons for the LEDs and Buttons. When I push buttons, it stays ON and when I push once again, it turns OFF.
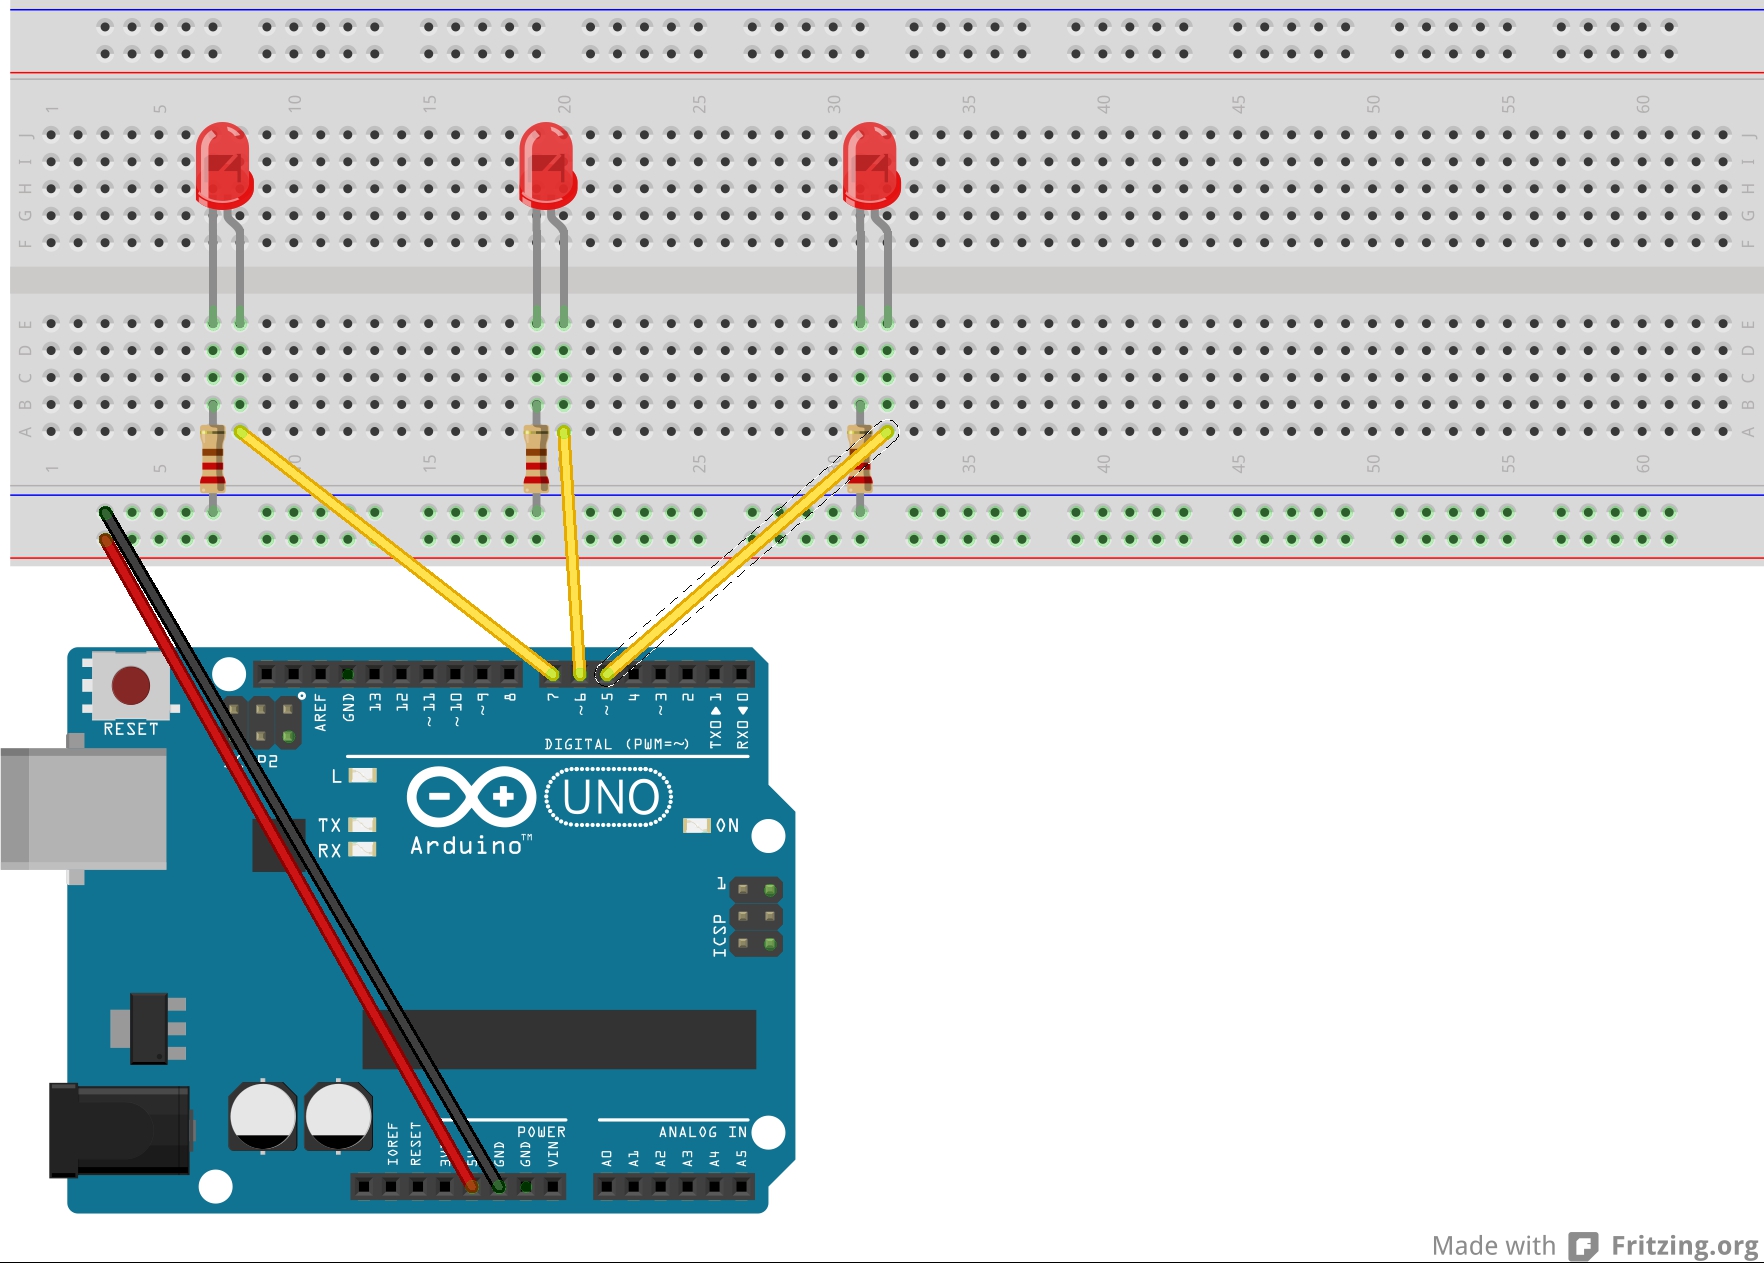
(1) 3 LEDs

int ledPin_red = 11;
int ledPin_yellow = 12;
int ledPin_blue = 13;

void setup(){
Serial.begin(9600);
pinMode(ledPin_red, OUTPUT);
pinMode(ledPin_yellow, OUTPUT);
pinMode(ledPin_blue, OUTPUT);

}

void loop(){

digitalWrite(ledPin_red, HIGH);
delay(100);
digitalWrite(ledPin_red, LOW);
delay(100);
digitalWrite(ledPin_yellow, HIGH);
delay(100);
digitalWrite(ledPin_yellow, LOW);
delay(100);
digitalWrite(ledPin_blue, HIGH);
delay(100);
digitalWrite(ledPin_blue, LOW);
delay(100);

digitalWrite(ledPin_red, HIGH);
digitalWrite(ledPin_yellow, HIGH);
digitalWrite(ledPin_blue, HIGH);
delay(1000);
digitalWrite(ledPin_red, LOW);
digitalWrite(ledPin_yellow, LOW);
digitalWrite(ledPin_blue, LOW);
delay(1000);

}

Image

(2) 3 LEDs and 3 Buttons

int ledPin_red = 11;
int ledPin_yellow = 12;
int ledPin_blue = 13;

int buttonPin_r = 4;
int buttonPin_y = 8;
int buttonPin_b = 10;

boolean pushed_R = false;
boolean pushed_Y = false;
boolean pushed_B = false;

void setup(){
Serial.begin(9600);
pinMode(ledPin_red, OUTPUT);
pinMode(ledPin_yellow, OUTPUT);
pinMode(ledPin_blue, OUTPUT);

pinMode(buttonPin_r, INPUT);
pinMode(buttonPin_y, INPUT);
pinMode(buttonPin_b, INPUT);

digitalWrite(buttonPin_r, HIGH);
digitalWrite(buttonPin_y, HIGH);
digitalWrite(buttonPin_b, HIGH);

}

void loop(){

static int buttonState_r;
static int buttonState_y;
static int buttonState_b;

buttonState_r = digitalRead(buttonPin_r);
buttonState_y = digitalRead(buttonPin_y);
buttonState_b = digitalRead(buttonPin_b);

if(!buttonState_r){
pushed_R = !pushed_R;
if(pushed_R){
digitalWrite(ledPin_red, HIGH);
delay(100);
}else if(!pushed_R){
digitalWrite(ledPin_red, LOW);
delay(100);
}
}
if(!buttonState_y){
pushed_Y = !pushed_Y;
if(pushed_Y){
digitalWrite(ledPin_yellow, HIGH);
delay(100);
}else if(!pushed_Y){
digitalWrite(ledPin_yellow, LOW);
delay(100);
}
}
if(!buttonState_b){
pushed_B = !pushed_B;
if(pushed_B){
digitalWrite(ledPin_blue, HIGH);
delay(100);
}else if(!pushed_B){
digitalWrite(ledPin_blue, LOW);
delay(100);
}
}

}

Image

Leave a comment

Filed under Uncategorized

Arduino HW: LED and Buttons

3 LED

Watch here 

Code:
int led1 = 7;
int led2 = 6;
int led3 = 5;

void setup() {
pinMode(led1, OUTPUT);
pinMode(led2, OUTPUT);
pinMode(led3, OUTPUT);
}

void loop() {
delay(200);
digitalWrite(led2, HIGH);
delay(200);
digitalWrite(led3,HIGH);
delay(200);
digitalWrite(led1, LOW);
delay(200);
digitalWrite(led2, LOW);
delay(200);
digitalWrite(led3,LOW);
delay(200);
}

Image

3 Buttons to control the 3 LED

Watch here

int switchRed=0;
int switchGreen=0;
int switchYellow=0;

void setup(){
pinMode(7, OUTPUT);
pinMode(6, OUTPUT);
pinMode(5,OUTPUT);
pinMode(10, INPUT);
pinMode(9, INPUT);
pinMode(3, INPUT);
}

void loop(){
switchRed= digitalRead(10);
switchGreen= digitalRead(9);
switchYellow= digitalRead(3);

if(switchRed==HIGH){
digitalWrite(7,HIGH);
digitalWrite(6,LOW);
digitalWrite(5,LOW);
}
else if(switchGreen==HIGH){
digitalWrite(7,LOW);
digitalWrite(6,HIGH);
digitalWrite(5,LOW);
}
else if(switchYellow==HIGH){
digitalWrite(7,LOW);
digitalWrite(6,LOW);
digitalWrite(5,HIGH);
}
else{
digitalWrite(7,LOW);
digitalWrite(6,LOW);
digitalWrite(5,LOW);
}
}

Image

Leave a comment

by | October 14, 2013 · 10:12 pm

LEDs with Arduino

3 Blinking LEDs:

I used the example provided by Arduino, and added a couple LEDs. I wanted the LEDs to all turn on and off progressively, instead of taking turns blinking to I changed the order of the HIGH/LOW commands.

Video

Code: 

int red = 7;
int yellow = 6;
int blue = 5;

void setup() {
// initialize the digital pins as outputs.
     pinMode(red, OUTPUT);
     pinMode(yellow, OUTPUT);
     pinMode(blue, OUTPUT);
}

void loop() {
     digitalWrite(red, HIGH);
     delay(500);
     digitalWrite(yellow, HIGH);
     delay(500);
     digitalWrite(blue, HIGH);
     delay(500);
     digitalWrite(red, LOW);
     delay(500);
     digitalWrite(yellow, LOW);
     delay(500);
     digitalWrite(blue, LOW);
     delay(500);
}

Image


Buttons and LEDs:

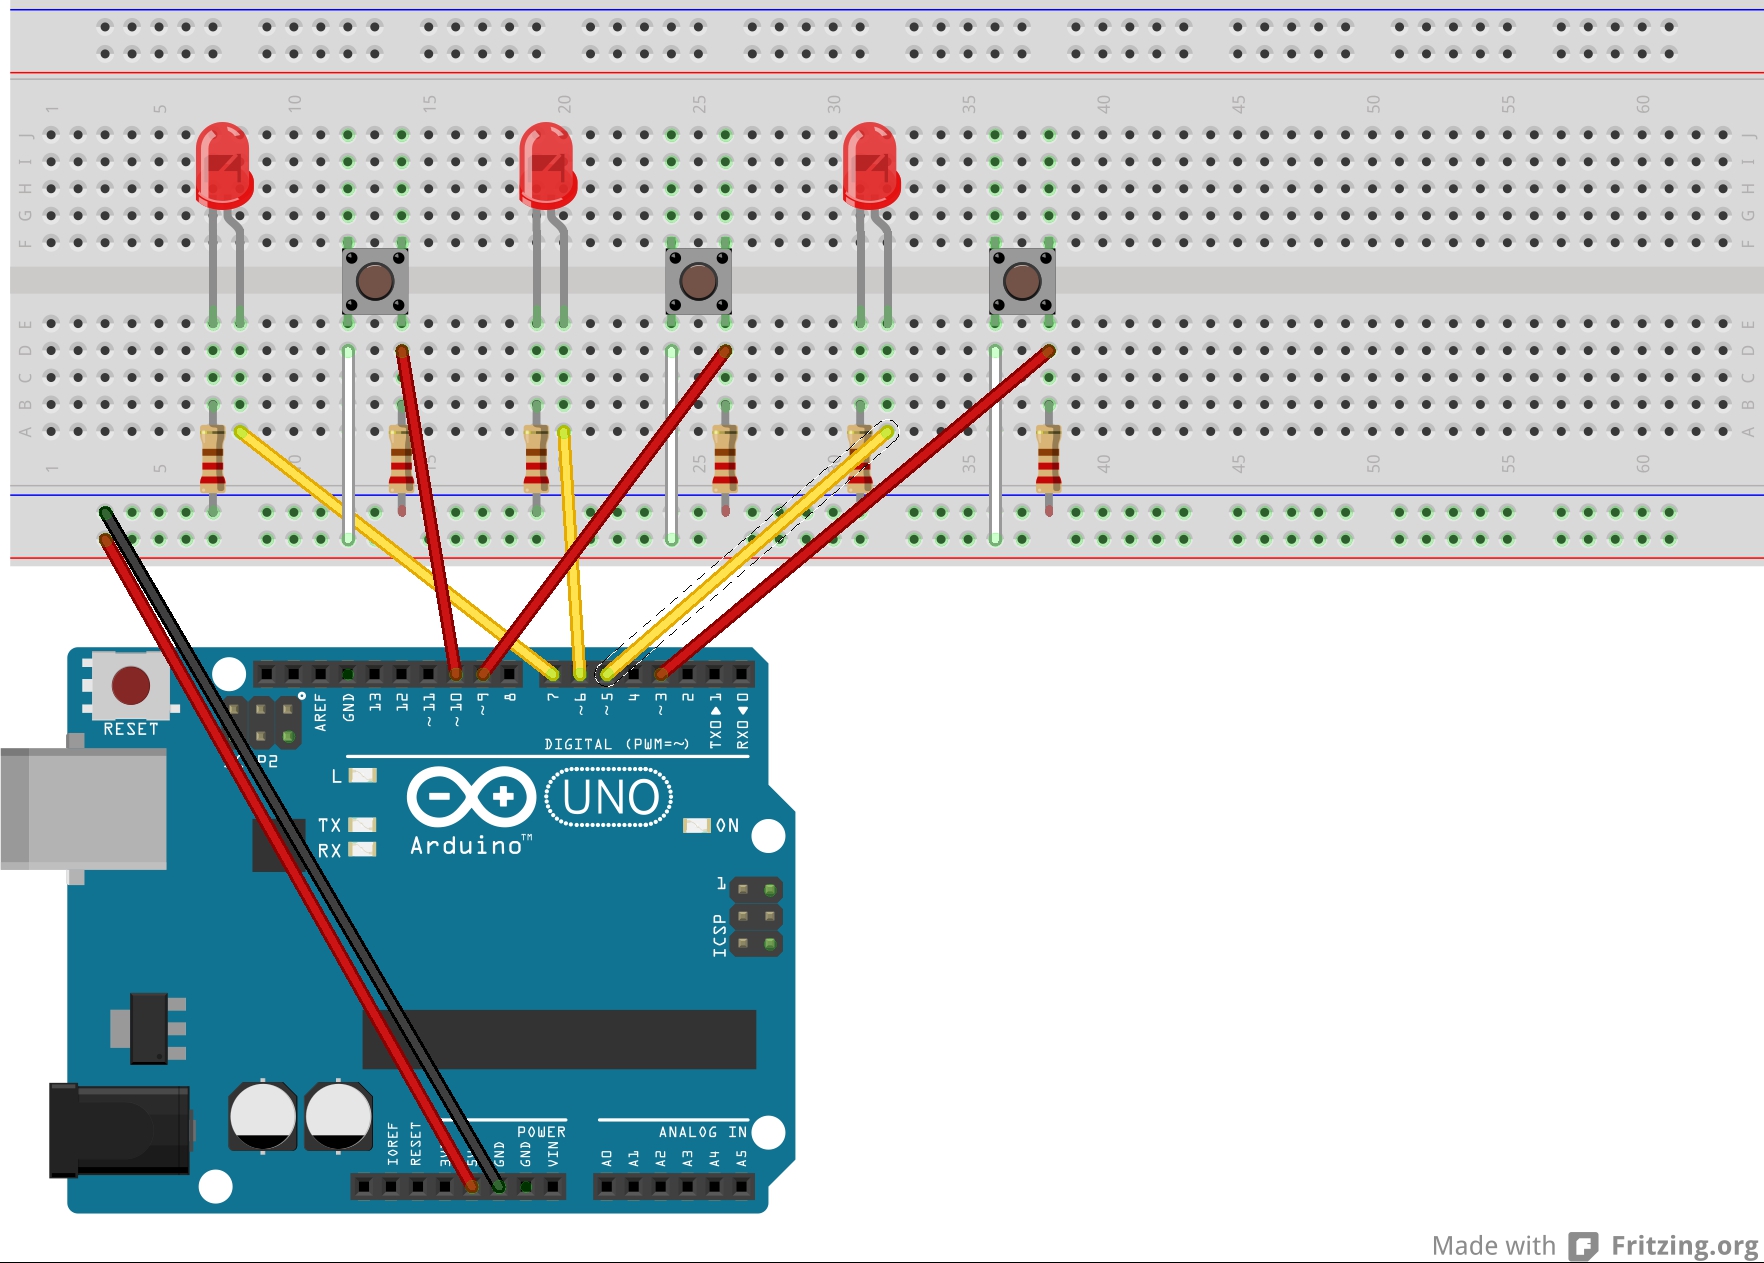
For this one, I used the same Arduino set up as I had for the blinking LEDs and just added buttons to the breadboard and connected them to the Arduino. As you will see in the video, one button turns on the red and yellow LEDs and the other button turns on the blue and yellow LEDs.

Video

Code:

int switchStateRed = 0;
int switchStateBlue = 0;

void setup(){
     pinMode(7, OUTPUT);
     pinMode(6, OUTPUT);
     pinMode(5, OUTPUT);
     pinMode(2, INPUT);
     pinMode(3, INPUT);
}

void loop(){
     switchStateRed = digitalRead(2);
     switchStateBlue = digitalRead(3);

     if(switchStateRed == HIGH){
          digitalWrite(7, HIGH);
          digitalWrite(6, HIGH);
          digitalWrite(5, LOW);
     }else if(switchStateBlue == HIGH){
          digitalWrite(7, LOW);
          digitalWrite(6, HIGH);
          digitalWrite(5, HIGH);
     }else{
          digitalWrite(7, LOW);
          digitalWrite(6, LOW);
          digitalWrite(5, LOW);
     }
}

Image

2 Comments

Filed under Uncategorized

LED Magic

Blinking LEDs (or Christmas Lights as I have deemed them)

References: I used the built in example and expounded upon it. For both of these, Carl Jadaa showed me that the number of LEDs for any given activity is irrelevant, so I took the attitude of the more, the merrier.

Video: Click here.

Fritz:

Image

Code:

int led = 13;
int led2 = 6;
int led3 = 2;

// the setup routine runs once when you press reset:
void setup() {
// initialize the digital pin as an output.
pinMode(led, OUTPUT);
pinMode(led2, OUTPUT);
pinMode(led3, OUTPUT);
}

// the loop routine runs over and over again forever:
void loop() {
digitalWrite(led, HIGH); // turn the LED on (HIGH is the voltage level)
delay(1000); // wait for a second
digitalWrite(led, LOW); // turn the LED off by making the voltage LOW
delay(1000); // wait for a second
digitalWrite(led2, HIGH); // turn the LED on (HIGH is the voltage level)
delay(500); // wait for a second
digitalWrite(led2, LOW); // turn the LED off by making the voltage LOW
delay(500); // wait for a second
digitalWrite(led3, HIGH); // turn the LED on (HIGH is the voltage level)
delay(200); // wait for a second
digitalWrite(led3, LOW); // turn the LED off by making the voltage LOW
delay(200); // wait for a second
}

LED Buttons

References: Used the built in example and expounded.

Video: Click here.

Fritz:

Image

Code:

// constants won’t change. They’re used here to
// set pin numbers:
const int buttonPin = 2; // the number of the pushbutton pin
const int ledPin = 13; // the number of the LED pin
const int buttonPin2 = 4;
const int ledPin2 = 12;

// variables will change:
int buttonState = 0; // variable for reading the pushbutton status
int buttonState2 = 0;

void setup() {
// initialize the LED pin as an output:
pinMode(ledPin, OUTPUT);
// initialize the pushbutton pin as an input:
pinMode(buttonPin, INPUT);
pinMode(ledPin2, OUTPUT);
pinMode(buttonPin2, INPUT);
}

void loop(){
// read the state of the pushbutton value:
buttonState = digitalRead(buttonPin);
buttonState2 = digitalRead(buttonPin2);

// check if the pushbutton is pressed.
// if it is, the buttonState is HIGH:
if (buttonState == HIGH) {
// turn LED on:
digitalWrite(ledPin, HIGH);
}
else {
// turn LED off:
digitalWrite(ledPin, LOW);
}
if (buttonState2 == HIGH) {
// turn LED on:
digitalWrite(ledPin2, HIGH);
}
else {
// turn LED off:
digitalWrite(ledPin2, LOW);
}
}

Leave a comment

Filed under Homework

#HW: API Susan

I did the very simple version but the review class last week helped. To me, API is more interesting than Canvas, and also more useful, I guess.  I would love to learn more and use it in the future.


http://a.parsons.edu/~shuyl105/#3%20Api.html

Image

<!DOCTYPE html>
<html>
<head>
<meta charset=”UTF-8″>
<title>JSON WITH API: Astronomy 1</title>

<script type=”text/javascript” src=”js/jquery-1.10.2.min.js”></script>

<script type=”text/javascript”>

/*Standard request URL format =
http://api.wunderground.com/api/b79e3040f6431025/features/settings/q/query.format
where
features=> type of data, here astronomy
settings=> lang or personal data
query=> location of data
*/

$(document).ready(function(){

$.ajax({
url: “http://api.wunderground.com/api/beaf6860b4d9bce1/conditions/q/CA/San_Francisco.json&#8221;,
dataType : “jsonp”, //jsonp for cross-origin files
//put you key into it>>to know who you are

success : function(parsed_json) {
console.log(‘success!!’);
//each nested object goes in []
var location = parsed_json[‘current_observation’][‘display_location’][‘full’];
var latitude = parsed_json[‘current_observation’][‘display_location’][‘latitude’];
var longitude = parsed_json[‘current_observation’][‘display_location’][‘longitude’];
var weather = parsed_json[‘current_observation’][‘weather’];
var temper = parsed_json[‘current_observation’][‘temp_c’];
var humidity = parsed_json[‘current_observation’][‘relative_humidity’];
var UV = parsed_json[‘current_observation’][‘UV’];


//var sunset = parsed_json[‘moon_phase’][‘sunset’][‘hour’];
console.log(“Location= ” + location);
console.log(“Latitude= ” + latitude);
console.log(“Longitude= ” + longitude);
console.log(“Weather= ” + weather);
console.log(“Temper= ” + temper);
console.log(“Humidity= ” + humidity);
console.log(“UV= ” + UV);

//console.log(parsed_json); //great debugging tool here!

$(“#Location”).append(“Location: “+location);
$(“#Latitude”).append(“Latitude: “+latitude);
$(“#Longitude”).append(“Longitude: “+longitude);
$(“#Weather”).append(“Weather: “+weather);
$(“#Temperature”).append(“Temperature: “+temper+” C”);
$(“#Humidity”).append(“Humidity: “+humidity);
$(“#UV”).append(“UV: “+UV);

} //end of success
}); //end of ajax
}); //end of doc ready

</script>

</head>

<body>
<ul>
<li id=”Location”></li>
<li id=”Latitude”></li>
<li id=”Longitude”></li>
<li id=”Weather”></li>
<li id=”Temperature”></li>
<li id=”Humidity”></li>
<li id=”UV”></li>
</ul>

</body>
</html>


Leave a comment

Filed under Uncategorized

API_Helen

It was REALLY hard to finish this assignment, however I finally figure out what the API and JSON is. Thanks Master P!! This is not a final version, because I do not have A server. To figure out this assignment Soohyun Park helped me a lot. Following code is what is did.


<!DOCTYPE html>

<html>
<head>
<meta charset=”UTF-8″>
<title>JSON WITH API</title>

<script type=”text/javascript” src=”js/jquery-1.10.2.min.js”></script>

<script type=”text/javascript”>

$(document).ready(function(){
$.ajax({
url: “http://api.wunderground.com/api/466cd5bcf7b4bba0/conditions/q/NY/New_York.json”&#8221;,
dataType : “jsonp”, //jsonp for cross-origin files
success : function(parsed_json) {
console.log(‘success’);
//each nested object goes in []
var Odata = parsed_json[‘current_observation’][‘display_location’][‘full’];
var Otime = parsed_json[‘current_observation’][‘observation_time’];
var weatherD = parsed_json[‘current_observation’][‘weather’];
var temperatureS = parsed_json[‘current_observation’][‘temperature_string’];
var humidityD = parsed_json[‘current_observation’][‘relative_humidity’];

//var sunset = parsed_json[‘moon_phase’][‘sunset’][‘hour’];
console.log(“observation_location : “+ Odata);
console.log(“observation_time : “+ Otime);
console.log(“weather : “+ weatherD);
console.log(“temperature : “+ temperatureS);
console.log(“humidity : “+ humidityD);

//console.log(parsed_json); //great debugging tool here!
$(“#container”).append(“<h1> Weather in “+ Odata +” </h1>”);
$(“#container”).append(“<p> Time : “+ Otime +” </p>”);
$(“#container”).append(“<p> Weather : “+ weatherD +” </p>”);
$(“#container”).append(“<p> Temperature : “+ temperatureS +” </p>”);
$(“#container”).append(“<p> Humidity : “+ humidityD +” </p>”);

} //end of success
}); //end of ajax
}); //end of doc ready{

</script>

</head>

<body>
<section id=”container”>
</section>
</body>
</html>

Leave a comment

Filed under Homework

Week 07: Arduino 01 – Intro to Electricity, Arduino and Outputs

Here is the presentation for this week:

week06-arduino1

Leave a comment

Filed under Presentations